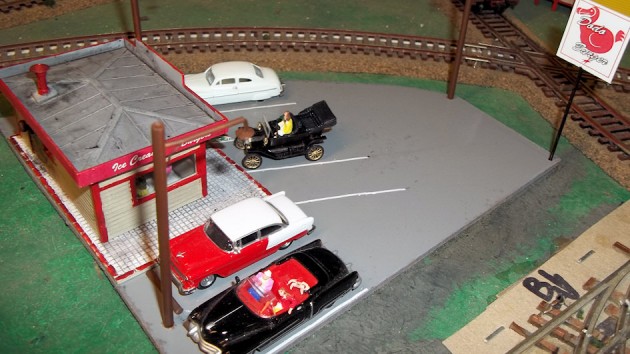
My layout depicts the Illinois side of the St. Louis, Missouri area circa 1955. To this end I keep on the lookout for a variety of area businesses from that era. One such establishment brought to my attention bore the unlikely name of “Dodo Burger.” Although this restaurant closed before I was born, I grabbed the chance to add an interesting vignette to the Daylines.
First, as I understand the restaurant operated as a drive-in hamburger joint, resembling, I suppose, Al’s from “Happy Days.” The place actually catered more successfully to families than teenagers. When it became a regular hang out for high school kids, the family portion of the business faltered, leading to the establishment emulating its namesake. In the year I model, 1955, however, Dodo Burger had yet to go extinct.
The first step in this project concerned a location for the business. To this end I picked a lot with an odd shape, which lent itself to a parking lot. The location chosen faces Main St. with tracks curving around one side and across the back. At the local hobby shop I found a Bob’s Hotdog Stand kit produced by Model Power. This little gem provided the perfect start for the project and helped define the size of the base required.
I constructed the kit according to the instructions with a few modifications. First, I removed the mounting tabs for the inner walls and counter. Next, I added a floor of sheet styrene, shortened one inner wall, and mounted them toward the rear corner near the back door to the kitchen. I also added a kitchen vent to the back wall. Lastly, I trimmed the extensions for all but one of the sign boards which mount to the roof. I sprayed the roof and back of the signboards grey, the walls almond, and the underside of the roof as well as the faces of the signboards white. Next I brushed red acrylic craft paint onto the trim, smoke jack, and kitchen vent. I sprayed the base of the model white and painted the edges tan and the tops of the edges red. I washed the base, walls, and roof with black craft paint thinned with alcohol. I also dry brushed around the vents using black acrylic craft paint.
I used Microsoft Word to design and print decals for the sign boards. I applied these to the entire surface of the boards using the excess portions to provide a consistent color to the portion of the boards which remained unlettered. I cut a piece of styrene and applied the graphic sign to each side. I sprayed all surfaces with Testor’s Dull Cote in order to seal the Decals and eliminate the shine of the gloss paint. A copy of the signs is provided below. I cut a piece of 1/8” hardboard to the shape of the location and sprayed if gray in imitation of a concrete parking lot. Next, I located the where the building would stand and marked the base accordingly. I determined the location of the parking spaces required and cut white Trim Film into strips measuring a scale three inches wide. These I applied using Champ Decalset. They broke up during the application, but fused back together with the application of the Decalset. I added pieces of sprue, measuring 0.010” in diameter, painted brown, as parking blocks to the two spaces needing them, which, according to my father who has memory for such details, were round logs in the 1950’s. I affixed the sign to a piece of sixteenth inch diameter brass tubing painted red and inserted this sign into the hardboard parking lot.
A parking lot of this type requires light. I constructed three light poles from scratch using a modified version of the procedure outlined in the article “old Style Street Lights Made Easy and Cheap” which appeared in volume 49 #4.5 Fall 2008 SouthErneR. First I cut a piece of eighth-inch brass tubing into pieces four inches long. I also cut a piece of sixteenth inch tubing two inches long. A quarter of an inch from one end I drilled a sixteenth inch hole in the side of the eighth inch piece of tubing as well as a #66 hole a quarter inch below it. I also drilled a #66 hole in the sixteenth inch segment of tubing a quarter of an inch from the end. I soldered the piece of sixteenth inch tubing into the hole in the eighth inch tube with the hole in the smaller tube closest to the larger tube and facing the long end.
Then I cut one lead to a half inch length, stripping the wire to the bulb. Next I slid the longer wire down the 1/16” tube after gently bending the tube slightly at the #66 hole so as to pass the wire through the hole. I inserted the stripped lead into the hole when an equal length of the insulated wire remained. After straightening the smaller tube, I inserted the wire into the #66 hole in the larger tube and slid it down and out the longer end of the tube. I drilled the hole in a sequin with a 1/16” drill and slid a 1 ½ volt bulb through the hole, securing the sequin in place with Zap a Gap. I filled the top of the pole with wood putty.
After covering the bulb with a short length of tubing, I sprayed the entire assembly brown. Next, I streaked a little black on the poles for creosote. I installed the three of these light fixtures onto the parking lot and then secured the building as well. I drilled a hold in the assembly inside the building and added an interior light. Finally, I added the figures and vehicles. Now, I think it is time for a burger. Fries anyone?


