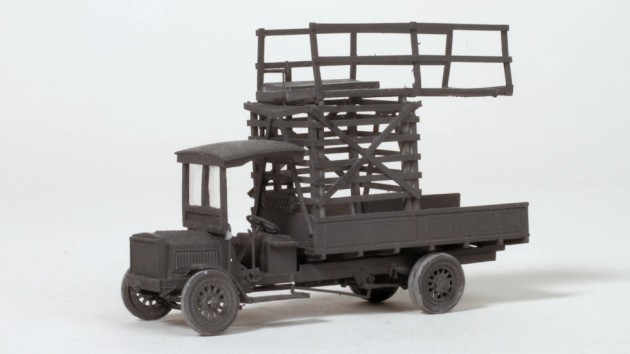
I model the East St. Louis & Suburban Railway companies as they would have appeared had they survived into the 1950s. As a result street cars, interurban cars, and steeple cabs dominate my roster of motive power. Another aspect that makes interurban systems stand apart from steam roads stems from the types of maintenance of way equipment in use. The most notable piece of maintenance equipment peculiar to interurbans is the line car, which allows men to work on the overhead wires used by most interurban systems to provide power to the cars.
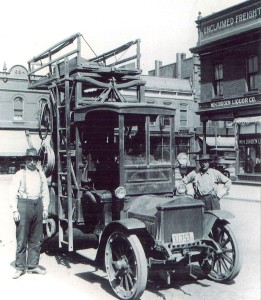
While researching the Great East Side Electric Railway System, I came upon a photograph of a line truck used in the early part of this century. Given the propensity of small operations to keep using equipment until it falls apart, I knew I needed such a vehicle on my layout.
At first glance I thought they had used a Ford Model T or Model A to construct the line truck. A second look showed that this was not the case. After a closer examination of the photograph, I concluded that maintenance department chose a Packard on which to create their line truck. The closer examination also revealed the truck had been repaired, since the front end sported a Federal radiator and a new front beam, probably the result of repairs after an accident. The truck also boasted a homemade windshield.
I started with a Highway Miniatures 1922 Packard Stake Truck (kit #231). I assembled the frame and oil platform and then replaced the radiator by cutting a piece of Evergreen clapboard siding to 3/8” by ¼” and framing it on all four sides with 0.010×0.060 strip styrene and on the top with piece of 0.040” square styrene. I filed slopes onto the top of the radiator to match the photograph. Next I assembled the radiator, hood, cowl, and floor together onto the frame assembly after removing the headlight bosses from the cowl. After that, I added the seat, transmission, frame ends, axles, link and link support, and the drive shaft, omitting the wheels at this time. When I added the front frame end, I cut a small piece of the stub from one of the gates on the parts sprue and added it in the middle of the front frame end.
I widened the running boards so that they reached the outside edge of the fenders with strip styrene. I modified the largest of the brackets to match the smaller straight brackets and attached two of these brackets to the ends of each running board. I then affixed the running boards and fenders to the frame after removing the mount for the large tool box. I added pieces of strip styrene to the fenders to match the photograph. I added the control panel, gear shift, steering wheel, and cowl supports next, followed by the steering rod, brake rods, and muffler. Next I added a pair of pieces of styrene tubing to the passenger side of the frame to simulate the winches in the picture. I also assembled the tool boxes and set them aside to add after painting and weathering. To the roof I added a frame of 0.010×0.060 styrene and shaped and evened the pieces. I assembled the cargo box less the stakes and tailgate. I cut four pieces of 0.040” square styrene 15/16” long and 20 pieces of 0.020×0.040 styrene 13/16” long. I installed two of the square strips inside the bed and then added five of the rectangular strips onto them with the tops 1/8” above the one below. I then added five strips to each side at the same positions and then added the other two square strips, followed by the remaining five strips. I braced this cage on each side with 0.020x.040 strip in an “X”, and an inverted “V” on the front and back of the cage.
For the service platform I cut a piece of car siding 13/16” wide by 1 5/8” long with boards running the length of the piece. I added strips of 0.020×0.040 styrene under the sides and on top of the ends. Additionally, I cut six posts from 0.020×0.040 styrene and attached them to the sides and then added railings at the top and middle of the posts. I cut four posts from 0.040” square styrene and attached them to the underside of the platform located inside where the posts of the cage ladder set. I also added a small piece of 0.040” square styrene to the front of the platform and drilled it and the button on the front of the frame to accept cranks cut and bent from 0.010” wire.
I fabricated a windshield frame from styrene and attached it to the cowl. I then added the roof to the top of the frame. Lastly I attached the bed to the back of the truck frame and the back of meet the bottom of the platform. I then attached the platform to the cage. After this I added a ladder from a Central Valley ladder set. I also added a small piece of 0.040” square styrene to the front of the platform and drilled it and the button on the front of the frame to accept cranks cut and bent from 0.010” wire.
I fabricated a windshield frame from styrene and attached it to the cowl. I then added the roof to the top of the frame. Lastly I attached the bed to the back of the truck frame and the back of the cab roof after attaching the seat cushion to the tower.
I sprayed the whole vehicle flat black. Next I painted the tire gray and mounted them and the hubcaps. I then added headlights and a spot light to the cab using pieces left over from building buses. All I need now is to weather the truck and add tools, tool boxes, ropes, wires, and poles and park my line truck on the layout.


