The first annual Gateway Division Paper Diorama Contest concluded at the January 21, 2014 division meeting.
3rd Place: Tom Trotter
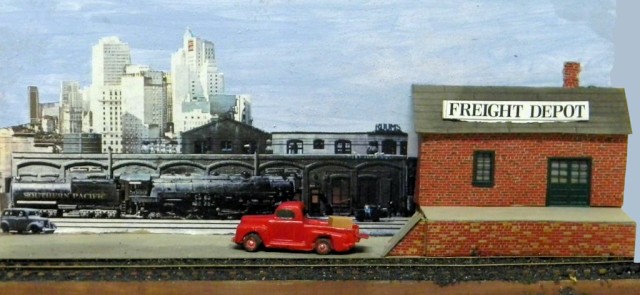
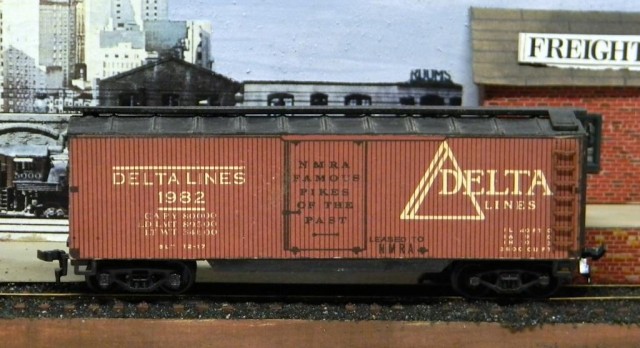
I was the late entry who took Dennis’s challenge when he said they were moving the judging of the modules from December to the January meeting and there was still time to enter a module. I had this NMRA commemorative boxcar for Frank Ellison’s Delta Lines which came with paper sides. I decided to build my module around this car. The base was built using a 1×4 and a Masonite back-drop. The sky was done using blue and white acrylic paints. The background scene was cut from an ad. The building and dock were done with the old time brick paper. The sign on the roof was cut from a box for a plastic building kit. I enjoyed building the module and it was a trip back to my early days in the hobby. -Tom Trotter
2nd Place: Tim Stout
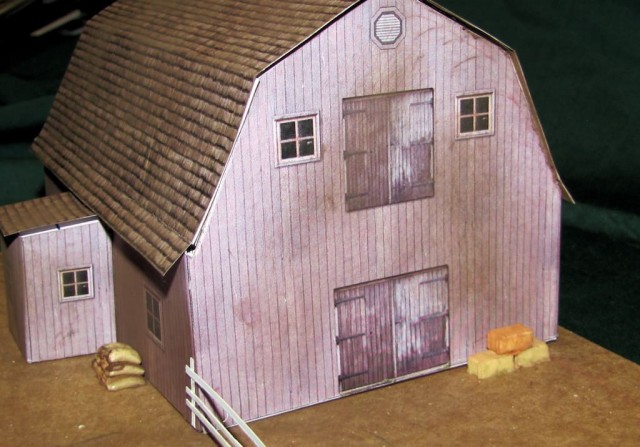
My paper diorama depicts a barn scene typical of farms across the Midwest.
The Kit
The barn is plan 1056 – Sumas Prarie Barn from http://scalemodelbuildings.com/ and is available for download for $4.95. Once I downloaded the file I was able to make as many copies as I liked for practice. I could have combined two printouts into a larger structure. I printed mine on matte photo paper using an HP color laser jet printer.
Starting Out
We cut out the pieces as precisely as possible, first practicing with regular paper and then on the more expensive photo paper. After some trial and error Brenda and I decided that it was better to glue the sides and end pieces together in the flat and then fold them after the glue had dried. This allowed me to line up the sides and ends with a steel rule so I knew the building would sit flat. It also made gluing the pieces together easier and more precise. I used a glue stick from Wal-Mart. Time will tell if the glue holds up.
Assembly
Once the glue was dry I folded all the corners using a steel ruler to keep them straight and make the bends sharp. Of course, Brenda would say that she had never seen an old barn in real life that wasn’t leaning a little.
I didn’t feel the paper building by itself was strong enough so I reinforced it with thin cardboard. I used a Hot Pockets box – could just as easily have been a shoe box. I cut the cardboard pieces a bit shorter than the walls to avoid interference at the corners. Once I had the cardboard cut to size I glued it to the barn printout with a glue stick. I repeated the same steps for the roof – cut it out, bend it along the form lines with a steel ruler and then reinforce it. It was some time during this process that Brenda left the room, again stating that old barns weren’t that square.
At this point the building and roof were still separate pieces. To help keep the barn walls square while I attached the first half of the roof I cut a rectangular piece of cardboard to use as a floor. With the floor inserted into the building it was now stable enough to attach the first half of the roof to the fold over tabs along the walls. I removed the floor for access and glued the second half of the roof to the fold over tabs. I then cut a slot in the middle of the floor so I was able to re-install it and pull down on it with my finger to glue it to the tabs on the bottom of the barn walls. This procedure was a little difficult and Brenda did observe that it was a good thing I was using a children’s glue stick instead of crazy glue.
The plan online shows a door along the side of the barn with a fancy looking roof matching the main barn roof. I didn’t like how that lined up with the main structure so I altered the original plan and simply made the porch over the door a flat roof with a slight pitch.
Staging
I mounted the finished barn on a piece of cardboard that is brown on top to represent dirt. Livestock have destroyed any grass that was growing by the barn resulting in bare dirt. The fence is white poster board cut into narrow strips and glued together with the glue stick. Various details like feed sacks, hay bales, water barrel, horse, and a skid of concrete blocks fill out the scene for now. Eventually the white fence will enclose a square area near the barn with a gate for access.
Final Touches
I was proud of my first paper diorama. Even though I used matte photo paper, there was a slight shine to the whole scene. Therefore, the building is lightly weathered using AIM weathering powders bought at the last RPM meet in Collinsville. I used mostly light browns to simulate dust, based on my experience around our barn.
This is the most inexpensive kit I have ever put together, and it was easy and forgiving, allowing me to print another piece and try again if I made a mistake. And as is true of all models, the results are only limited by your imagination. -Tim Stout
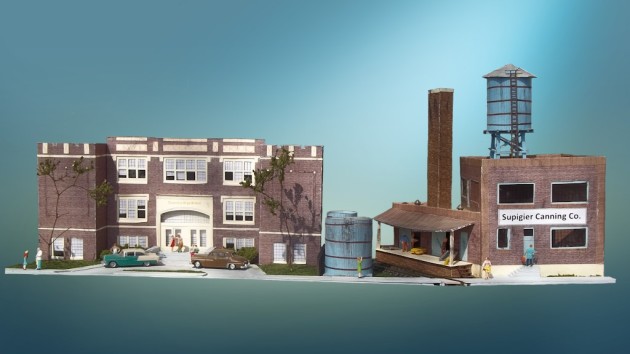
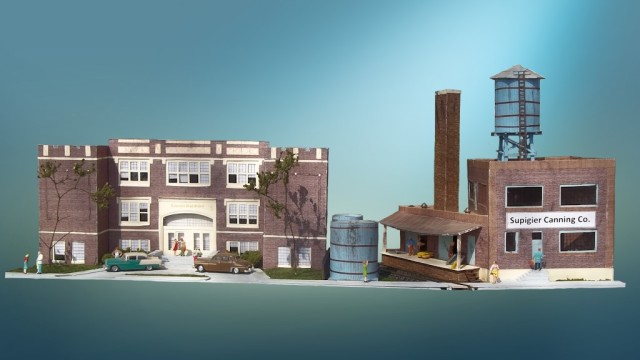
1st Place: John Carty
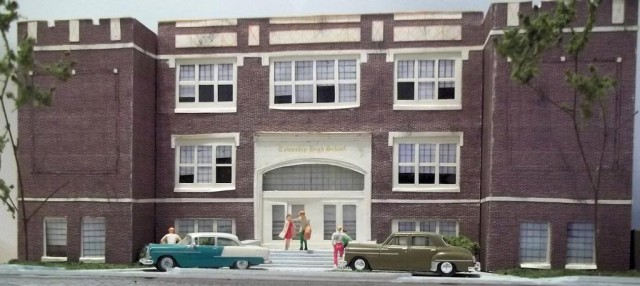
Modeling a particular location and era demands signature structures. Township High School (Old Belleville West), now Lindenwood University, remains a landmark in Belleville. Fortunately, the Lindenwood website sported a photo from the 1950s. I modeled only the main building as a low relief structure measuring twelve inches wide, significantly compressed from the nearly eighteen inches required for a full width structure in HO scale. The driveway and sunken garden are also compressed. Next door to the high school on the west stood what was a Pepsi Bottling plant in the 1980s, but had been a meat canning plant which was served by rail of which I found no photos. This required a little engineering based upon common practices as well as switching the dock from the east side of the building to the west side.
Both buildings consist of a cardboard core covered with brick paper and light cardstock details. I cut all openings from the core before applying the paper using white glue spread very thinly so as to be tacky. After the glue dried, I wrapped the paper over the top and sides and trimmed it at the window openings folding the flaps to provide brick on each side of the window. Doors and windows consist of light cardstock with acetate lined with a felt pen for glass and copy paper shades. Both buildings were braced with 1/4” and 3/16” basswood secured with yellow carpenters glue. Roofs are cardboard painted black after installation. I built the steps using layers of balsa wood.
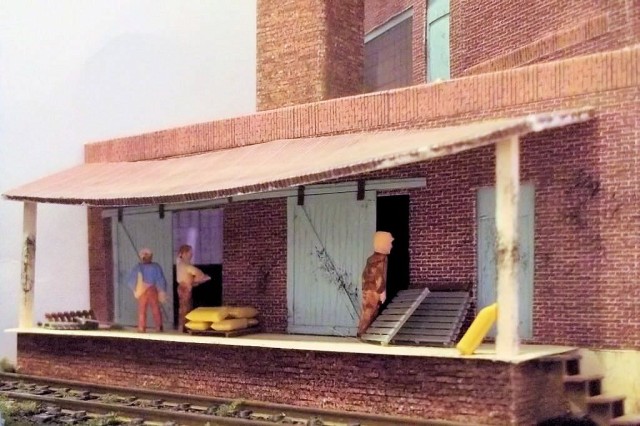
Masonry details consist of layers of cardstock for the high school and brick paper on the canning plant along with a cardstock foundation. The smoke stack consists of four pieces of card board with 1/16” balsa in the corners wrapped in brick paper. The dock is cardstock and brick paper over basswood with the overhang built from balsa wood and covered in metal roofing printed paper. Signs were printed using a laser printer with the one for the high school printed before construction began.
The water tank on the roof and the brine and vinegar tanks consist of scribed cardboard wrapped around label cores with cardboard roofs, bases, and hatches. Roofing is masking tape. I applied paper bands and hinges which I colored with a permanent marker to the tanks after painting.
I painted Preiser and Model Power figures as well as ladders and fence from Central Valley. I cut a short piece of Atlas flex track to which I added a pair of ties to serve as a bumper. Mini Metal automobiles, Tichy sacks and pallets, balsa sidewalks, baby’s breath trees, and Woodland Scenics ground foam and ballast complete the scene. Weathering consists of dry brushed acrylic paint and Bragdon powders

