LEDs (light emitting diodes) provide a superior lighting solution over miniature bulbs. LEDs stay cool when lit and are very bright, energy efficient, and extremely reliable. Their long life and reliability are extremely important when installed in engines and buildings, where you really don’t want to ever open it up again to replace a light. And since they run cool, you don’t have to worry about melting or discoloring plastic near an LED, or catching paper or cardstock on fire.
LED Basics
LEDs are fundamentally different from miniature lamps. LEDs are semiconductor devices, which means you need to apply a specific voltage to turn them on (called the “forward voltage drop”), and once that voltage is reached you need to limit the current flow or the LED will immediately “burn out” (too much current and some actually blow up – overheating and exploding a section of the plastic housing away). So a current-limiting resistor is normally wired in series with each LED to ensure the current is always below the maximum current rating. This is different from miniature light bulbs, where too much voltage will destroy the bulb.
LEDs are also sensitive to polarity, meaning you need to use a DC power supply and connect the correct wire to the positive lead and the other to the negative lead or it won’t light up. Accidentally hooking up an LED “backwards” won’t hurt it – as long as the current-limiting resistor is in place – it just won’t light.
Finally, LEDs (like most semiconductors) can be destroyed by too much heat or static electricity. Unless you have a very bad static electricity situation, LEDs are fairly immune to damage that way. But excessive soldering heat can destroy LEDs quickly. You may want to place a heat sink clip between the LED and your solder connection, and then solder very quickly – the connection should be made in less than a second. And remember to only use rosin flux – acid flux should never be used on any electronics.
White LEDs
LEDs are manufactured in a variety of colors – red, orange, yellow, green, blue, IR, and UV. To make a white LED, an ultraviolet or blue LED is coated with a fluorescent coating that emits the desired “white” spectrum mix. Changes in this coating can produce different “white” LEDs – from a very warm color like traditional household light bulbs to the very bluish-whites of cheap fluorescent lamps. This range is described as the light’s color temperature and is rated in Kelvins (K). A very warm white would be 2700K. Standard warm white is 3000K to 3200K. “Natural” or “cool” whites are around 4000K. Daylight is considered 5500K. Shady daylight, and cheap fluorescent lamps, are 7000K to 8000K.
The color of “white” Christmas light sets are much more loosely described. You usually have the choice of either “warm” or “cool” white light sets. You’ll want “warm” LEDs for most model railroading uses, as that 3000K-ish color works best for building interiors and engine lights. You’ll find that the actual color varies between light set brands. “Cool white” Christmas light sets are usually in the 5500K to 7000K color range and look bluish. This is great where you want that color difference, such as when modeling fluorescent or mercury vapor lights or bright spotlights.
LED Sizes and Shapes
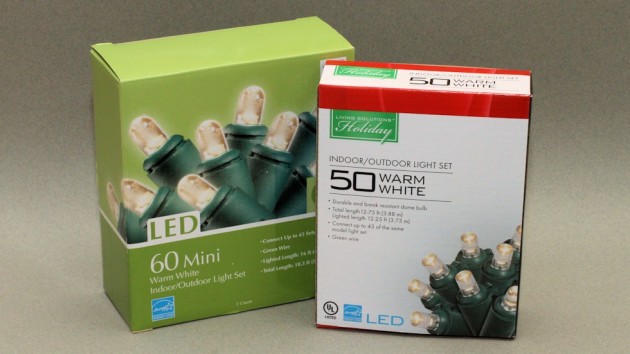
Individual white 3mm LEDs typically sell for a $1 each (or more) mail order or at a hobby shop (and about the same as miniature light bulbs). A Christmas light set of 50 or 60 white LEDs may only cost $4 on sale – under a dime each – a considerable savings. LEDs come in many shapes and sizes, but the most common Christmas sets use the 3mm diameter LEDs most useful for model railroad purposes.
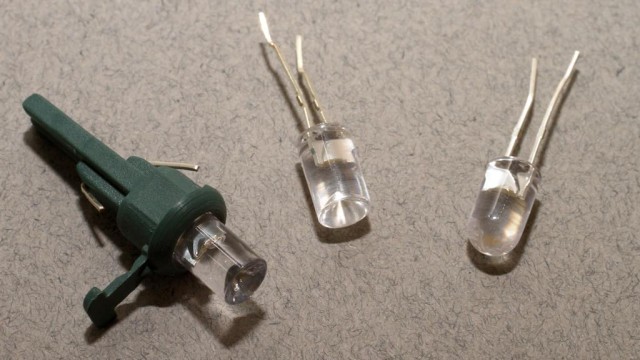
Unlike light bulbs which produce light in all directions, LEDs produce a directional beam of light. This is great for engine headlights, since that directional beam is what you want. “Dome” top LEDs create a narrow beam of light perfect for headlights and spotlights. “Inverted cone” top LEDs take the beam and scatter it in all directions around the top of the LED. This style works best for building and passenger car interiors. Below are examples of dome and inverted cone LEDs from two different Christmas light sets.

Examples of common white LEDs from holiday light strings. The two on the left are the “inverted cone” design which work best for structure lighting. The standard rounded end LED at right has a very directional beam, most suitable for headlights and spotlights. The LED at left is still in the original socket from the light string.
Wiring LEDs
Christmas light set LEDs are normally mounted in a plug-in socket. You can cut individual socketed LEDs from the light string to wire building interiors, or you can remove the LEDs from the sockets and straighten the leads. The longer lead is the positive (or anode) side. The shorter lead is the negative (or cathode) side. The negative side is also sometimes marked with a flat bevel on the LED case.
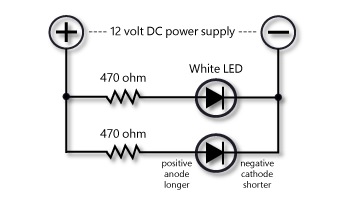
The best way to connect multiple LEDs is for each LED to have its own current-limiting resistor. White LEDs are usually 3.2 to 3.6 volt devices rated at 20 milliamps max. This means you would use 470 ohm 1/4-watt resistors for white LEDs powered by a 12 volt DC power supply. It doesn’t matter on which side (positive or negative) the current-limiting resistor is connected – just make sure to always use a current-limiting resistor. 1K current-limiting resistors are typically used for white LEDs connected to a DCC decoder. 1/4-watt resistors normally cost under $4 for a package of 100 (mail order).
You connect the positive side of the LED to the positive side of the DC power supply.
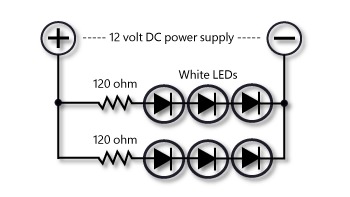
It is also common to wire three white LEDs in series with a 120 ohm current-limiting resistor and a 12 volt DC power supply. Each set of three LEDs has its own resistor. This is how the cutable strips of LEDs used for home accent lighting are wired.


